Friday, December 23, 2011
Matte Black
Well I took a gamble on the matte black in the Electric Kiln Ceramics book. I got a few pots in the little kiln, two decent sized vases and an oval serving dish. The big deal for me is that I'm not liking the cone 6 firings. I should say the 818P isn't liking the cone 6. The envirovent slows down the cone 6 firings to a two day process no matter what I do. My only recourse is to fire with out the envirovent on. This time I tired to do that, but the red earthenware was gassing off so badly I couldn't see my witness cones. I decided to just pop it on for a second to clear it just to check the cones. I cleaned out the atmosphere at the end real well for a soak of 50 minutes. It was really a slow cool though as the kiln began to cool off slowly with the dials set to low. Can't wait to see if I've got a glaze that I like. I'm kicking myself for not putting at least one of the iron red samples in this load. Oh well, next time.
Monday, December 19, 2011
Fall
I've not had much to say this fall because I've not been able to work in the studio much at all. I'm finally on Christmas break from EOU and I'm back on the horse. Threw a few mugs today and have resolved to design a new mug form since I'm not impressed with anything I've made today. I pulled out the sodium silicate to make some crackle slip mugs. I did a few and had some fun, but I my slip was a bit thin so I couldn't get a nice brush mark out of my coarse hair brushes. The crackle is only slightly interesting and isn't at all what I was looking for. I resigned to make one more mug with just brush marks and no crackle. Tomorrow I'll make and assemble a mug. I'll post a picture if something of note comes from my effort.
Tuesday, November 22, 2011
Research
It seems I'm always doing research. I've been reading a lot about matte glazes, in trying to get something in a cone 6 matte. I've run into a clay club blog with some good glazes on it. It's amazing how you know when you find good websites or blogs, and then you run across them referenced on other websites and blogs. In this spirit here are some links I find fascinating.
http://www.patrickhorsley.com/
http://www.kazegamas.com/index.htm
http://ncclayclub.blogspot.com/
http://www.patrickhorsley.com/
http://www.kazegamas.com/index.htm
http://ncclayclub.blogspot.com/
Sunday, October 30, 2011
Etsy
You can now see on the right side of my blog a gallery listing from my Etsy store where my pots can be viewed and purchased. If you would like more information, or to put in a special order request please email me at potterpdx@yahoo.com and put "BenCo pottery questions "BenCo pottery special order" in the subject field.
Thursday, October 27, 2011
Glaze Research
Digital Fire has a lot of free links that hold a wealth of information. You can find chemical data on nearly all individual materials, as well as a number of formulated glaze recipes. What I've been working on the last week is trying to figure out proper formulations for durable matte glazes in both Cone 1 and Cone 6. I have found a myriad of recipes for high gerstley borate matte glazes. Which I know from first hand experience from testing in college that these glazes are not durable and they leach. So I'm trying to come up with a formula made from the materials I have on hand that make a matte glaze. The good news is I've found shiny base glazes for both the cone 1 and the cone 6. I've also found some proven cone 1 and cone 6 macro crystalline glazes. I have a lot of testing to do now that I've done some research. However for anyone who might be interested in these types of glazes here are some links to digital fire that might help.
http://digitalfire.us/4sight/education/g1214w_cone_6_transparent_base_glaze_121.html
http://digitalfire.us/4sight/education/g1214z_cone_6_matte_base_glaze_122.html
http://digitalfire.us/4sight/education/formulating_ash_and_native-material_glazes_188.html
All three of these links are great. The last one is of particular interest because I have an ash deposit that contains a known material cataloged by a geologist with the USGS.
Thursday, October 20, 2011
Good in Bad
You know how they say things happen for a reason. Well this recent firing made me read up on a lot of stuff I'd already learned but had maybe not remembered lately. It also made me do a bit more digging to find some things I did not know.
For some time now I've been interested in doing crystalline glazing in my studio. In fact it was Wally Schwab who first introduced me to crystalline glazes when I studied under him at PCC Rock Creek. I'd also done quite a lot of research into microcrystalline glazes at MHCC with Don Sprague. Since then some advances have been made by other potters to fire these glazes at cone 6. When I looked at these before I'd found a cone 1 crystalline glaze as well, but had lost the recipe. Well I found it yesterday, so I'll be tinkering with that one soon thanks to Charlie Cummings post on Clay Art Thread. I also did some research into the firing schedules and found out that the crystallization is happening upon cooling, but a very slow cooling where the kiln is held at the 1830 - 1900 degree mark for four hours. What's interesting is this is when the iron in cone 5 iron reds is held to facilitate crystallization as well.
As you may know there is a huge difference between Orton cones. The large ones drop much faster than the small ones, in fact a large cone 6 drops at 2228 where a small doesn't drop until 2291. Sixty three degrees doesn't seem like a lot when you're talking about thousands of degrees, but it's enough that it could make a glaze go from stable to runny. It's not just the temperature but also the time it takes to get to the higher temperature.
Charlie Cummings
Macrocrystalline Cone 1
Frit 3110 - 43
Zinc Oxide - 23
Silica - 16
Lithium - 9
Laguna Borate - 9
Wednesday, October 19, 2011
Firing Up, Firing Down


Tuesday, October 18, 2011
Misfire
After some consideration I'm fairly certain that my trouble with this firing was a cone malfunction combined with a quick cooling. I did a leak test on some cone 10 pots I put in the firing and they are vitrified. Some parts were unglazed and did not leak. The cone 6 glazes I used were supposed to be matte and completely melted and ran down the pots. The kiln took a very long time to reach top temperature, like 4 - 6 hours longer than I expected. I'm fairly certain that the kiln actually hit cone 8 - 10 range. I'm going to purchase a packet of cone 5 and a new box of cone 6 and try these glazes again.
Monday, October 17, 2011
Lack of success
Well my first cone 6 firing in my new location was a failure. The kiln cooled too quickly trapping bubbles in the glaze on all the pots. The matte transparent also came out a shiny and clear which leads me to believe that the long time the kiln took to reach temperature made the glaze over mature. It became fluid and started to run down the pot as if it were not a matte glaze at all. Quite disappointed in this one, however I did get some great color response in both the purple and the blue. As Churchill said "You can always count on American's to do the right thing, after they've tried everything else." Looks like I need to wrap my kiln is fiber or something.
Cone 6
Wow my small electric kiln takes a long time to reach cone 6. I'd been doing cone 1 for a while now which is about the top end of lowfire. Cone 1 makes vitreous durable pots out of low fire white clay. However the clay has a sticky feel and is not as nice to throw as cone 6 porcelain or stoneware. Besides I've got some great cone 6 recipes to go with some really great cone 6 clays that I enjoy working with. I'll continue to do cone 1 because it's fun and cheap.
I have a bunch of cone 6 porcelain that I really didn't like so I wedged in some mulcoa 47 grog 35 mesh, which stopped all the finicky problems that high spar content clays have. With about 10% added grog to the wet weight, the porcelain takes on a whole new personality. It retains it's plasticity, and gains structural integrity, and fast drying capabilities. This clay went from S cracking while drying unless you kept it under plastic for days and flipped it on the rim while it was still quite wet, to being able to throw plates and leave them until the rim and inside is leather hard, flipping and trimming the majority of the foot while wet, then coming back and finishing off the last bit once it's leather hard. Never being covered in plastic and drying in the kiln room at about 85 degrees of dry hot air in the room. I love porcelain, but the forgiving nature of a clay with grog is just so much more satisfying. With a full schedule of classes I need a forgiving clay that will wait if I want it to, but can dry quickly if I want it to as well.
I've also been making some "Patrick Horsley pots" which is really my take on his techniques. I've really been enjoying the method which has opened a whole new design element to my work that was not possible before I took his workshop. I've taken to making these figurative jars that are flattened to an oval and have a wider shoulders and body with narrower bottom half and narrow neck. I find them fun to make as well as aesthetically pleasing. The porcelain with grog has been an effective clay in making these pots.
Sunday, September 25, 2011
Research
I'm a big fan of ceramics books. The one drawback of my book library is that a lot of it is dated material in classic ceramic books. One such thing I found was Jack Troy's book Salt Glazed Ceramics. The book covers how to make salt glazed ware, and salt kilns. In his book he used Portland Cement because the newer alumina refractory cements weren't available when he wrote the book. Toward the end he discusses the ongoing research in castables which he discusses adding alumina to the cement in ratios. Well I did a lot of reading and found many articles talking about castables and several covered this in detail claiming that adding alumina oxide or alumina hydrate to a cement would not work.
I did a lot of reading on castables and refractories. I read research papers books, blogs, discussion boards, websites, technical data sheets etc. All of this research led me to a basic formula for a medium to light castable cement which was mentioned in my last blog consisting of, 2 parts fire clay, 2 parts grog, 2 parts saw dust, 1 part cement. For this recipe I chose to use Ciment Fondu because of the fairly reasonable price of $44.00/bag-94lbs.
We used this product in my mom's backyard oven. I have some concerns about the oven because the castable will shrink considerably and my parents decor design has a flaw. They wanted to use bricks on the outside and we'd already decided to use a castable cement. Well the cement is going to shrink some when I fire the oven off the first time, and the bricks will not shrink. This means that the interior will shrink away from the bricks and there will be a gap. This would not be a problem except we used a sprung arch design in the top of the oven for maximization of space. As it shrinks it can become unsupported and crack, or even fail. I'm going to strap the thing together with steel support braces prior to firing, but who knows if it will work or not... The one thing I could not find (and did not test because of time constraints) is the shrinkage of this castable upon firing. I guess I should hurry up and fire off the blocks I've made.
Wednesday, August 31, 2011
Long time no blog
It's been a while since I've blogged because I've been fishing a lot and not making pots so much. I do however have the studio in place pretty much. At least enough that I can wedge clay and make pots. So I'm doing that and awaiting the cash flow to complete the kiln project. I'm only short a few hundred bucks, but it's amazing how much a few hundred bucks is when you don't have it to spare.
The great thing is I've been able to get my feet wet with castable cement in the building of a backyard cook center for my mom. We've built a catenary arch kiln style oven with a small arched firebox in the bottom and a level cook top in the oven chamber. I'm pretty excited to finish the piece off this weekend. I'm going over there to build the final frames for the big catenary arch which is going to be the top, sides and back of the oven.
To build this thing we've used lincoln 60 fireclay, pine shavings, fine and course mulcoa grog, and Ciment Fondu which is a 40% alumina refractory cement. This was used in a 2,2,2,1 parts formula.
2 Fireclay
2 Pine Shavings
2 Grog
1 Ciment Fondu
We had to substitute some sand to complete the cook top because we were running out of aggregates at the time. We also had to substitute some Portland Type II cement into the cook top because we ran out of Ciment Fondu. So the top of the firebox itself has about 2 inches of good refractory cement, and the top of the firebox layer or cooktop has about 2 inches of Portland Cement. For this application it should be just fine, although I did have the idea that I would burn this thing to red/orange one time to cure it and I don't see that happening with Portland Cement. We'll see how it goes, but I certainly don't want to push the cook top the the point that it fails.
The tall arch we're about to build is going to be a 2" layer of medium density castable just like the firebox pieces were, followed by a 3 inch layer of light castable made with perlite. In the big arch we're going to put holes which will later hold spring mounted bolts for a flange which will hold the doors. There will be two doors on the oven one small one down below for the firebox and one up top for the oven which will be quite large.
Sunday, July 10, 2011
Keep it Moving
It's been a period of constant transition for the last year. I've been unable to set up shop for very long because we keep having to up and move. I'd planned this time to stay here for at least a year, but here we are again in a position where we need to move. The current living arrangement has failed to work as intended and I have to give up my two car garage, my huge office and my new garden space that's full of vegetable plants. I'm really bummed out!
So we're looking at places somewhere outside Vancouver. A couple look promising, but no concrete plans as of yet. One little place on an acre in Orchards is particularly interesting, but it has no garage or basement. I could build a cheap out building made of Plastic and cattle panel for a greenhouse and a shop.
The good news is, I have done the research and can now build a large castable kiln for a few hundred bucks. I'll be building the arch frames and ramming my mom's oven by the end of the month.
The bad news is the move is going to cost me all my student loan money and I'll likely lose all my vegetable crops when I go.
Wednesday, July 6, 2011
Redware
So here I am with 300 lbs of porcelain, and I'm itching to make replica Pennsylvania Redware. The bright red clay with white slip trails covered in a bright amber glaze have me mesmerized into buying a couple boxes of red clay in Tacoma this weekend when I'm up there. The question is will I have the money for the 10 other things I'll end up buying when I go?
http://www.ceramicartdaily.net/booksales/Electric_Wilz-3.pdf
http://www.ceramicartdaily.net/booksales/Electric_Wilz-3.pdf
Oven
So I've been testing some castable recipes for my mom's Earthen Oven we've been prepping to build in her back yard. I dug through some old posts on the old clayartcenter.net forum and found several referring to a 4,4,4,1 recipe. My tests are as follows.
#1
4 Fireclay
4 Grog
4 Charcoal (Crushed)
1 White Cement
#2
#1
4 Fireclay
4 Grog
4 Charcoal (Crushed)
1 White Cement
#2
4 Fireclay
4 Grog
4 Charcoal (Crushed)
1 White Cement
1 Talc
#3
4 Fireclay
4 Grog
4 Charcoal (Crushed)
1 White Cement
4 Pearlite
The original recipe called for grog ranging from dust to 4mm particles and sawdust ranging from dust to 3/8". I can get grog that size, but I had a difficult time finding combustible materials that size range. I can get dust and I can get chips, that's pretty much it. So I figured if I crushed up some of this Mesquite Natural Log style charcoal, I'd get the size range. It worked but I gotta tell ya, crushing much of anything by hand with a 8lb hammer isn't the most fun I've had.
The Talconic Castable is really close to the original, but I was aiming to have a slightly better heat dispersion. I was also thinking it would cure at a slightly lower temperature. We'll see how it performs through the test I made. It's just a slop brick form, but it's got an arch built into the bottom so I can measure any sagging or warping that might occur. I believe this is only about 7.2% talc by weight, so it shouldn't cause too much of a problem.
My concern is the white cement I purchased. The spec sheets for the material claims it boils at about 1000C. Does this mean the castable will begin to mature near Cone 06? While I realize her oven won't get to that temperature after the initial firing to cure, I'm wondering how these guys are using white cement in Cone 10 castable kilns? Or are they using a different Cement? All the research I've done says they use white cement for earthen ovens. One post I found the guy claimed to have used a recipe from Jack Troy's book published in 1977 called Salt Glazed Ceramics. In that kiln he claims to have used white cement, and fired with salt for 10 years before the arch failed. That doesn't say how many firings. He could have only done 10 firings for all I know. I just purchased the book from Powells Books to take a look. When I do build a castable kiln, or castable slab floor (which I'm doing in the kiln I'm building now) I expect it to hold up for 100 firings or more.
Stay tuned for the results.
Mid-range Porcelain
A while back I decided to buy a box of pretty much every kind of Cone 5 - 7 Porcelain I could get my hands on. There were a few I couldn't get at the time, but I have like 8 different kinds that were in stock. I finally was able to drag my wheel out and get to work.
The first box I grabbed was OH - 6 made up in Tacoma at Clay Art Center. It's got good throwing capabilities, as I thew a 10" cylinder with ease right off the bat. It promptly broke down when I expanded the cylinder. I can't fault the clay too much it is porcelain after all and I was abusing it like a stoneware with grog, trying to push it to failure.
I did make another pot, and it cracked upon drying. I got a ring crack on the bottom of the pot, which tells me that it dried too long on the bat prior to trimming. I probably need to slow the drying a bit as well, or be more attentive. I could trim quite a bit wetter. I waited until the pot was easy to trim. It had been sitting on the bat it was thrown on for about an entire day. I could probably have flipped it after 6 or 8 hours and then trimmed it between 8 and 12 hours. My garage is drafty but cool because of the big cement slab being directly on the ground. There is also an apartment built above the garage that provides protection from the sun, so it stays cool if it stays shut.
I'll have to give it a few more tests, but I still have many clays to go, so if this one proves to be too picky I've got some 35 mesh Mulcoa with it's name on it. It'll behave, one way or the other.
Friday, June 3, 2011
Bio-diesel
I did some research into fuels recently because of all the recent backlash against bio-diesel. What I found was striking to say the least.
From the data above it's plain to see the largest yielding conventional crop currently grown in US soils would be peanut.
The basic idea of growing crops for fuel instead of food could be considered a bad thing in and of itself, it's definitely a bad thing to grow a conventional food crop which produces a very low quantity of oil as an oil crop. Yet this is exactly what the US farmers are doing. Corn is the lowest yielding crop that could be planted for fuel.
Seed Stock/Oil Yield in pounds per acre
Peanut/764
Canola/600
Rapeseed/600
Safflower/600
Soy/600
Linseed/350
Corn /200
Cottonseed/200
This data was derived from
Buchanan, G. (2010). Increasing Feedstock Production for Biofuels: Economic Drivers. BRDI , 3.
The basic idea of growing crops for fuel instead of food could be considered a bad thing in and of itself, it's definitely a bad thing to grow a conventional food crop which produces a very low quantity of oil as an oil crop. Yet this is exactly what the US farmers are doing. Corn is the lowest yielding crop that could be planted for fuel.
Under the current methods of production I cannot endorse bio-diesel. I thought I'd be the last one to encourage government involvement in private industry, but the bio-diesel market needs to be regulated. Corn needs to be taken out of the Feedstock for bio-diesel production.
However there is nothing wrong with using waste oil of any kind as fuel be it corn, peanut, soy, animal oils even. Most of these are low in emissions and have a high energy output. I'm personally inclined to purchase land and become a peanut farmer for the production of bio-diesel myself. The yield being nearly 4 times that of the corn farmer, the comparative advantage is astronomical.
Cerameconomics
In pricing out materials I've found an array of prices for the exact same materials. I'm told it's because some places purchase large quantities of materials at once and have old stock on hand which they can sell me for cheaper. Well I'm here to tell you that the guy down at Georgies who told me that can stick his stock on hand where the sun don't shine. Their prices are outrageous and I see no other reason but that they are price gouging because they are pretty much the only game in town for ceramic artists.
Up in Tacoma however I have been pleasantly surprised by not only the products offered to me by the Clay Art Center, but also their prices. Their customer service is great on weekdays when the boss is there. On weekends the head honcho is out and the place is packed with way to many customers to be effectively helped by the staff on deck. That aside it's a pleasure doing business with Clay Art Center in Tacoma. They provide me with my wet clay, dry clay, raw materials for glazes, and the best part is they're willing to put my order on the back of the next truck headed for Stark Street Studios in Portland for a reasonable fee.
Up in Tacoma however I have been pleasantly surprised by not only the products offered to me by the Clay Art Center, but also their prices. Their customer service is great on weekdays when the boss is there. On weekends the head honcho is out and the place is packed with way to many customers to be effectively helped by the staff on deck. That aside it's a pleasure doing business with Clay Art Center in Tacoma. They provide me with my wet clay, dry clay, raw materials for glazes, and the best part is they're willing to put my order on the back of the next truck headed for Stark Street Studios in Portland for a reasonable fee.
Thursday, June 2, 2011
Nitride Bonded SiC
When considering the many options to build my kiln I first began to price materials. Oh boy there are a lot of materials to choose from these days. When I first started I didn't know my burner port from a whole in the ground. After some deliberation I found the cost wise Ceramic Fiber was going to be the key to my success in mobile kiln building.
I had decided to use a brick floor for durability and stability. When trying to price out bricks, I'd first looked at IFB's which I'm sure would be nice, but quite costly. I then found several deals on websites such as alibaba.com where some international company based in China posts refractories and some base price. After attempting to deal with them I quickly found that it was more trouble than it was worth. I would be quoted different prices than were posted, they didn't actually have the material on hand and were giving me "custom order" pricing. Once I realized I needed to buy local I tried to find the most local guys I could get my hands on. I had stumbled across many blogs and threads talking about many refractory companies, such as AP Green, Narco, Harbison Walker. I searched and found ANH's website online and quickly found my local supply warehouse located out on Jennifer RD in Clackamas OR. They're a good bunch of guys who sell some superior products such as the Ceramic Blanket I purchased which was made in the USA.
I ran out of dough before purchasing bricks from Harbison Walker and had been perusing the internet looking for deals. I stumbled on another company which is extremely local Thermal Ceramics, which has a manufacturing facility located out in the Rivergate District in N. Portland. Thermal Ceramics is the company which produces the Kaowool product that ceramic artists know so well. I purchased another product from Thermal Ceramics called Cerachem which is a 2600 degree rated blanket that I'm using as the blast face on top of the ANH blanket which is rated at 2300 degrees. After talking with Jeff for a while he and I both came to the conclusion that in my next kiln which will be a salt kiln, I should test some SiC bricks in a small test kiln. Well after giving the idea quite a bit of thought I figured I'd try them in the floor of my new oil kiln as well to see how the hold up. I decided this because they will be subjected to some of the most extreme flame conditions I can imagine. And if they don't work I'm only out a couple hundred bucks, and can just rebuild my floor with IFB's or high duty bricks with ease since the kiln is made of blanket anyway. A few hundred bucks later and I had enough bricks to build a basic kiln floor with bag walls and all.
I really can't stress enough the impact these refractory guys have had on my project. When I started I was full of questions, and now I have still have questions, but I have some answers as well. I recommend both ANH and Thermal Ceramics for your refractory needs.
Friday, May 13, 2011
Beginning to set up in my new space. At the moment there is a lot of stuff in there that doesn't belong in my studio so that's the first task. Looks like I won't have time to begin the kiln building process until my break at the end of the month. It's been a strange transition to living here with Betsy's sister. A bit of a rocky start has yet to really smooth out.
We did get a new dog, his name is Kona. We rescued him from the roadside near the coast. He was wandering around looking for food at the gas station. He's got a great personality and is great with the dogs and kids here. He's adjusting fine to the environment as well with better quality dog food and a schedule of eating, drinking, and walking. He seems like a really great dog, though I have yet to get him in to get shots.
Wednesday, April 27, 2011
Vacant
My space is vacated and I'll soon be setting up shop. I purchased 500 lbs of fireclay and some mullite grog to make thick tiles for the hot face of the floor of my kiln. I'm actually going to hand mix and then pound these tiles. I'll cut them out using a template once I measure shrinkage by firing some off in my small electric kiln. I'll only be able to guess at shrinkage since I'll only be firing to cone 6 in my electric, but it should be close enough. My final kiln dimensions will be dependent on these tiles anyway. I'm going to attempt to make them 12" square and 1.25" thick. I've also decided to make back up tiles of fireclay and vermiculite which I plan to pound out and cut with a similar template. I'll follow that up with a layer of red brick for the base layer on top of the cart. Yes it's going to be a car kiln. I can't imagine making a kiln this large and loading in it nearly 4 feet deep.
Sunday, April 24, 2011
Stuck here again
Waiting is the worst...
Especially when you have about three grand laid out in products and material and you're simply waiting for someone to vacate your space.
Monday, April 18, 2011
Mobilization
My terrific aunt April sold me her trailer. It's a small steel flat bet with two wooden panels in the floor. I'm putting two cattle panel pieces in place of the wood and building the kiln in the back of the trailer. I have yet to decide how the floor/door is going to be built and I'm running out of time. I need to get it built and start making pots.
The decisions still to be made:
Floor brick:
- High duty firebrick
- Silicon Carbide
I have both of these available to me at the moment for a good price. I would like SiC to try them out more than anything.
Car Kiln Cart/Standard floor:
I could build this either way. I have the materials available to me to build the cart, I'm just not sure I want to mess with it on my first ever real kiln build of my own. If I'd done it in previous kiln building workshops I'd feel more comfortable. Either way I'm going to essentially have the same materials, just arranged differently.
Burners:
I've been toying with the idea of actually throwing, or molding some fire clay burners. I've got loads of high refractory fire clay and grog that I'm going to mix for the saggars anyway. I have enough clay to build a small kiln out of it, and at the price of it I probably should do just that for my next project which will be a soda kiln.
I could easy enough go get some black metal pipe, cut it to length, rig up the oil line and air and spend my time tuning them instead of going through the effort of making them from scratch materials. It would be smart to do both I guess then I get burners for sure either way. Never heard a potter crying because he had too many burners laying around.
I have however decided to go with a compressed air system after all. The blowers are fairly cheap, but the compressor does double duty and I'm running lower and lower on funds for the project. Purchasing a compressor seems like the smart thing to do considering how much I'll use it for glaze application anyway.
To sum up:
This downdraft kiln will be a cattle panel frame, fiber blanket kiln on the back of a flat bed trailer with compressed air, vegetable oil powered burners, and it will either be a car kiln or a standard floor with a swing open door that bolts shut. Either way it will most likely have SiC brick floor to test it out prior to building a full SiC wood kiln/soda in the future. This future project will most likely be a pellet/oil kiln and not actually wood. I've been toying around with recycled fuel pellets and I aim to come up with a working kiln based on them in the coming year.
Wednesday, April 13, 2011
Hiccup
The company who sold me the basket was out of Kansas City MO. This company sells these baskets on ebay. I chose to buy one from here because my purposes don't require that it be fresh and clean just that it be strong and straight.
Well long story short the guy tried to bait and switch me with a low shipping quote for "commercial address" then jacked up the shipping quote to almost double for a "residential fee." I told the guy to go stick it in his ear I wasn't paying double, I'd already told him I wanted lift gate service to my house before the quote.
So I've looked around and can buy some other baskets for about the same as he was offering. I also realized I don't really need a basket, it just makes it easier to move later when I buy a house. So I did a bit of research into fencing and found a 4 gauge wire cattle panel. These come 16ft X 50" and would be plenty strong enough for my purposes. I've decided to make the first one out of these cattle panels because the cost is so cheap. 60 bucks will get me the entire outer shell including hardware to bolt it together with U-bolts.
After giving up on the trailer thing my generous aunt April is going to sell me their all metal trailer for a good deal. This does a couple of things for me. It gives me the ability to set the kiln up as originally intended, completely mobile, and it takes care of the issue of me having to prepare a ground site which was proving to be more work than I'd wanted it to be already.
Now all I have to do is figure out how I'm going to frame in the door supports. I'll probably have to get my friend Cyris to weld a simple tube frame. If I have the money I might have him weld the frame for the whole kiln which is only 8 tubes altogether.
This pen is made of a similar cattle panel to what I'm going to use to build the support structure of my kiln.
Wednesday, April 6, 2011
A tisket a tasket
Look at that huge basket! 0,0

So this is a picture of what my kiln will be made inside. It's a 4000 lb rated industrial wire basket. I will be making a basket lid for the top and cutting a few holes for the stack and burner ports. I could easily make an updraft kiln out of this, but at this time I've decided to make the first fiber version a down draft with a short fiber stack. It will be lined in the bottom with a few layers of ceramic fiber paper 1/8 inch thick, and a layer of insulating fire brick. The walls will be constructed of 3 inches of fiber and hand made refractory ceramic buttons, held in pace with Kanthal A-1 wire.
The hotface of this kiln will be 1" layer of 2600 degree blanket made by Thermal Ceramics called Cerachem. The backer is 2" layer of 2300 degree blanket made by Harbison Walker. Both of the US companies produce superior and reliable products. I chose blanket for my kiln because of it's ease of construction.
The links below are to the two companies I purchase refractory products from. The top link is a pdf of the Thermal Ceramics blanket, and the other is the history of Harbison Walker (ANH), because their data sheets are not available to the public. None the less ANH is a great company, the sales staff at the Clackamas distribution center will bend over backwards to help meet your refractory needs.
http://www.barteltinsulation.com/pdfs/CERAMICBLANKET.pdf
http://www.hwr.com/EEC/Incineration/HWRHistory.asp
The buttons will be fireclay mixed with Mulcoa 40 grog (3X8 and 35 mesh) and some ball clay. Somewhere around 50% fireclay, 40% Grog, 10% Ball clay will be the mixture. I'm making a small mold to pound them into so I can pop out the buttons and fire them off easily and uniformly with good density and strength.
I did a lot of research on wire to hold these in place. This kiln will primarily be for cone 6 however I will end up doing cone 10 now and again for specific things such as the ceramic buttons. Maybe some other refractory items for my studio such as saggars, tiles etc. I may also make some parts for an outdoor oven which my mom is building this summer. So the wire must be able to withstand 2400 or so just to make sure. Most Nichrome wire will not withstand above cone 6 for very long. The Kanthal A-1 is a proven material for electric kiln elements for high fire even up to cone 11, 12 and will easily withstand my kiln temps.
Originally I had planned on buying a cheap wire feed welder from Harbor Freight and welding together some round steel rod making myself a box. When I found the one similar to the picture above the price was hands down better than all the long hours in the welding booth. I picked mine up used, but couldn't find any good ones locally and had to pay for shipping from back east. All in all it was still worth it getting me two huge baskets 44X55X44 for 65 each, plus shipping of 200. Altogether 330 bucks and all I have to do is fashion a lid and I'm done. Not to mention there is no worry about the strength of the material because it's an industrial quality basket rated at 4000 lbs. Another reason I chose this route is because I am still a renter and will be moving. Even though this is a heavy basket it can be moved even once the kiln is completed. One better plan is to build the kiln on the back of a trailer, which still might happen if I have the cash. I want to make sure I don't short myself before getting my burners completed first.
This brings me to the burners. I've decided to experiment with a large ventilation blower. It's a fully adjustable inline centrifugal blower made for industrial ventilation. It blows 450 cfm maximum which is more than enough. I'm going to try and rig up two burners to the same blower because this thing should have the power. I will have to build a small sheet metal splitter box that merge the 6" duct with two smaller burner pipes. I've decided to go with a small heated metal pail of about 1 gallon or so in size for the oil. I going to install a small heater either under it or inside it with which to heat the oil. The oil lines will not have far to travel this way and there will not be too much oil close to the fire. The entire apparatus will be strapped to a cart or hand truck for easy storage in my garage when not in use. I'm going to install a small port in the splitter box and a butterfly valve in which I can block off the blower and send some LPG down the burners to preheat before igniting the oil. This is all an unproven, untested system that I've never seen used before so we'll find out if it even works.
Wednesday, March 23, 2011
R&D
We the potters in an effort to build a more perfect kiln...
I've been researching materials to build a newer type of salt kiln consisting of inner protective plates of high refractory something like used kiln shelves, wrapped in fiber blanket or board. Cordierite seems to be one of the cheaper materials on the market, but it's not the most resistant material in a caustic environment. In my current plan I chose to use both 2" fiber blanket and vermiculite board for the two outside layers. All of this is pinned down to a steel frame made of angle iron and expanded metal grate. I have yet to test the vermiculite board against caustic materials such as wood ash and soda vapor. I may end up going with just plates inside and two layers of blanket outside. I've found many different companies that produce plates that could be used, at the point it all comes down to cost v.s. useful life in the environmental kiln. I plan to make a small test kiln consisting of these materials. A lot of these materials I've found listed on alibaba.com.
One other thing I plan to try is a glass material from the UK which can be painted on the plates to create a barrier layer of glass that inhibits the corrosion of the caustic vapors from eating away at the kilns liner. All of this will go on the back of a small trailer so that it can be toted around to where ever I go.
What ever kiln I build will be fire with waste vegetable oil (WVO) or a combination of WVO and propane. I've done some extensive web research on how some of these burners are made. In the end after trying to build my own I may decide to purchase some commercially made burners. They are extremely expensive but seem to work exceptionally better than anything I've seen. They also can burn just about anything in the lubricant isle.
Aside from the music this is a good video showing the afore mentioned commercially made burner.
Another video showing the set up and start up of the same type of burner in a furnace.
Here's a good example of a nice homemade liquid propane gas burner
Here's an example of a dual fuel burner utilizing liquid propane gas for initial start up.
This last example is more like what I've been leaning toward in my own design.
Thursday, March 17, 2011
Sodium kiln research
As a desire to continue some research I'd done at MHCC returns to my focus, I've been investigating materials to be used in the construction of a small soda test kiln. I stumbled on this article which I found particularly fascinating. It would appear that the majority of the research has been done for me already. I must express my gratitude to Peter Meanley for providing an excellent paper to base my future investment in salt kiln materials against. Below is a link to the article in question for those of you who might wish to build a soda kiln that lasts long enough to pay for itself.
http://kilnshelf.publishpath.com/Websites/kilnshelf/Images/Insulating%20Materials%20for%20Salt%20Kilns%20Article.pdf
http://kilnshelf.publishpath.com/Websites/kilnshelf/Images/Insulating%20Materials%20for%20Salt%20Kilns%20Article.pdf
Wednesday, March 16, 2011
Space...the final frontier
Building a gas kiln has proven to be a difficult thing in my current situation. Primarily because I'm a renter, not an owner. It comes down to an issue of space because I don't have a space which would be acceptable as a kiln site. Lately I've been looking into fiber because of it's ease of use and lightness. I had planned on making a small basket style kiln for a while as a test. Something like the Simon Leach raku kiln video on youtube linked below.
http://www.youtube.com/watch?v=OQB7bDAYWL0&feature=fvsr
After looking at many, many... many videos and blogs about fiber kilns an idea struck me to build the kiln on a trailer. So as I'm planning this, shopping for a metal flat bed trailer and compiling a materials list I stumble on a website of Steve Davis, who makes trailer kilns and does workshops. I had been thinking how clever of an idea I'd just come up with, and been really excited because I'd never even heard of this idea before. I can't say I am dead set on his entire design of the kiln, but it's certainly great. It's pretty much what I'd already designed except I'm using different burners and my flow path is not a straight cross draft but a down draft. Because of the type of burners I've designed I need a larger firebox than this kiln has designed. There's really no better way to conquer the space issue for me personally.
I will be building one, with a completion time of mid summer hopefully. I've really been itching to get back into stoneware temperatures. I am contemplating building a smaller mock up design that will only require about a two rolls of fiber and a cart instead of an entire trailer to save on initial costs considering I don't know if I like the fiber as a kiln material.
Linked below is Steve Davis's website showing his designs for what he calls a Kazegama.
http://www.kazegamas.com/kazegama.htm
Monday, March 14, 2011
Break it down
I've got a few hundred pounds of cone 10 clay in my basement. I'm not currently nor in the near future am I firing to cone 10. I've decided to try and reformulate these clay bodies to cone 1ish. Looking at the clay recipes for cone 3 most have a mixture of similar components. One major component to these clays is talc. Some cone 6 clays have about 10% talc or less. Cone 08 clays have near 50% talc. So a happy medium is a low talc body I've been using that's white stoneware mixed with a nice ball clay and about 25% talc as well as a little bit of soda spar. So what I'm doing is cutting the clay up into thin slices and laying it out to dry. Once the clay is dry I'm going to mix in about 25% talc and rehydrate in about 100lb batches. I have several plaster and bisque molds with which I will dry the clay back out down in my basement. It will probably take me about a week and a half to get the clay dry and reformulated. I'm hoping to have 300lbs of clay ready to throw by the end of the month.
Buff color body made from ball clay, fireclay, soda spar, talc.
Porcelaineous Body - porcelain, ball clay, soda spar, talc
Red Body - stoneware, ball clay, redart, soda spar, talc
I'm going to try one of the Porcelain cone 10 bodies I have in a line blend with soda spar to try and bring it down to cone 6 nice and tight.
Thursday, March 10, 2011
Basket Case
In Pat Horsley's workshop he showed many slides of what he called baskets. These oval shaped pots had extruded handles spanning the their tops and resembled baskets in form only with no woven character. In his slides the remarkable thing was that even early on his glazes were good. He seemed to almost perfect the formation of color and surface quality very rapidly. The only thing that had some lacking in his early work were his forms themselves were somewhat bleak or spartan. He quickly remedied this as well soon producing pots that were dynamic in both glaze color and surface quality as well as intriguing forms.

Here is a greenware pot inspired by Pat Horsley, but the form itself is influenced by Don Sprague, Wally Schwab and a little of my own ideals thrown in to complete the functionality of this pot. This pot is entirely wheel thrown from top to bottom. The main body is constructed of a bottomless cylinder wider at the bottom, pressed into an oval. The bottom is a wheel thrown slab cut off the wheel and immediately slumped into a bisque form to start the concave form and to more rapidly dry it for attachment. About 20 minutes later I attached the bottom slab to the upside down oval cylinder. The foot and handles are thrown and taken from the same ring of clay.
The handles are my only real complaint on this pot. They need to be longer and attached at the sides for increased strength. Ethically I cannot sell this pot because the handles may fail the user with hot liquids causing someone to get burned. I will end up using it as a fruit bowl since mine was given away as a gift recently.
Thursday, March 3, 2011
Clean Slate
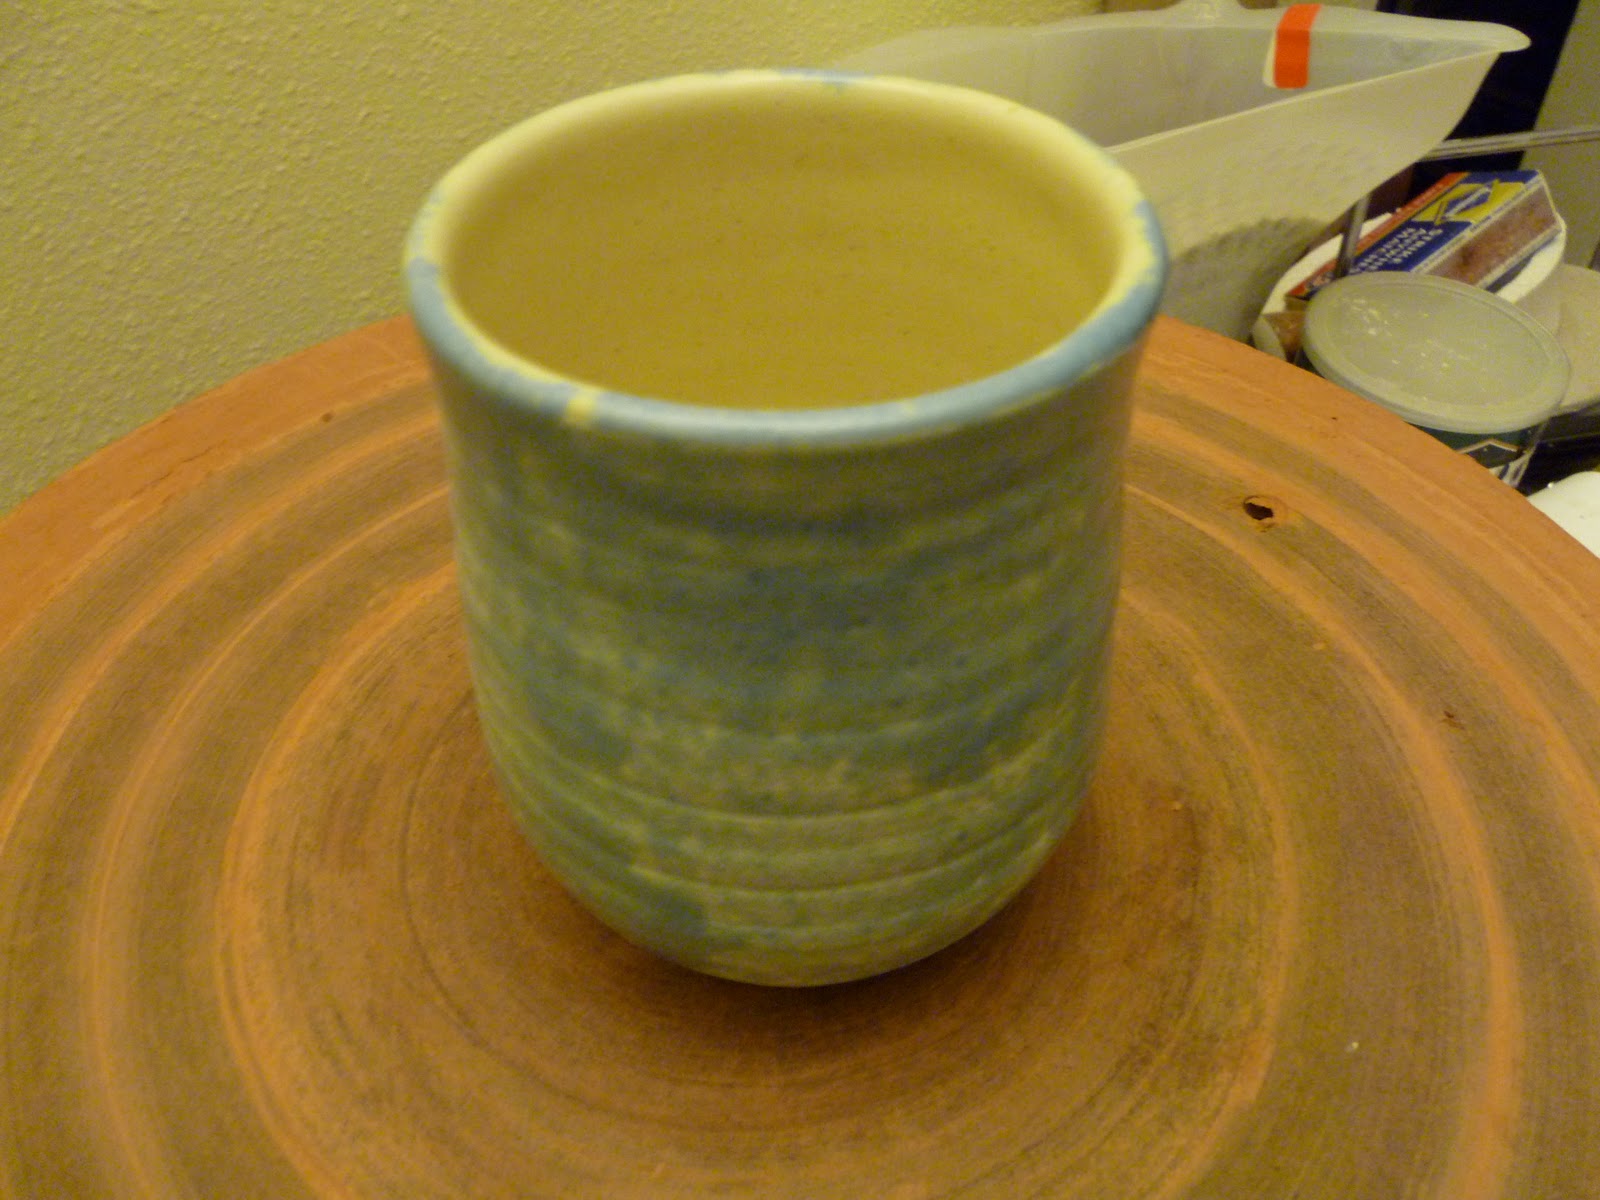
This is a slate blue glaze on a red clay. The high iron content of the clay gave the glaze a greenish appearance where thin. Where thick it's a deep blue like the paint used on submarines. It's glassier than the original recipe description, which I'm thinking is because of a substitution of 3134 for 3124. It also might be because I'm using Unispar instead of Kona F-4. All in all I call this pot a success, it's got acceptable color response, and on the red clay the glaze stopped bubbling and healed over. I will probably reformulate this glaze with 3124 and apply it dipped on white clay in my next test.
 |
| This picture was taken with light from an open window. The sunlight brings out the green, inside the pot is blue. |
The Blues
Cadwell's Base is a strontium crystal matte glaze that has a zirconium opacifier. The zirconium opacifier tends to make colorants lighter and more pastel in color. The strontium should form a matte crystalline structure on the surface of the pot giving a nice muted matte look over all. The mottled appearance in the glaze on these pots is my application not the glaze. I had decided to use a hand pump sprayer to apply these glazes allowing me to make less than if I were to try and dip these pots. The sprayer was a failure, but this base is a success in several ways. Color response is exactly what I was expecting, muted softer colors. Texture is a bit shinier than I had anticipated, I'm not sure why yet, but all my glazes came out much glassier Three other colors are formulated, but not fired yet, a yellow, gray and a rust red.
 |
|
 |
|
 |
|
 |
|
Substitution

In the last post I mentioned some glaze testing I've been doing. I've been using digital fire (glaze calculation software) to try and formulate glazes that have materials which are no longer available or are cost prohibitive. For instance Redart is a cheap material commonly used in glazes. I tried to formulate a couple glazes with Redart in place of Barnard. Of course these two clays are not even close to the same. In manipulating the other materials I hoped to get something close.
The pot pictured to the left is what I got, and it is actually color response wise pretty much exactly what I was expecting. However I had added another variable to the mix, trying to adapt a cone 3 glaze to cone 1. I believe what I have here will actually melt out closer to cone 4 - 6. It has small bubbles that did not heal through out the entire glaze. It's a mustard yellow that breaks chocolate brown.
I tried to apply this glaze thinly to give the two tone brown yellow, however I wanted stripes of yellow in the tool lines left behind from my shur-form. My haste with the application gave me brown with patches of yellow.
Wednesday, February 23, 2011
Glazes
I've been doing a lot of research into midrange matte glazes. I've accumulated a fair quantity of cone 1, cone 3, and cone 6 glaze recipes. Several from a well known and popular book called Electric Kiln Ceramics by Richard Zakin. I've decided to do some line blends of a couple of his glazes. I expect to get a green/blue, a rich blue, red/yellow, red/brown, black and metallic matte glazes out of this battery of testing. It might not happen immediately because I'm trying to use a handful of materials instead of everything under the sun.
Patrick Horsley's workshop made available to me some of his glazes, however they are formulated for reduction, but I've decided to see what the red matte looks like anyway. The first tests will all go into the next load which will be fired to cone 1. While I'm shooting for a handful of very specific colors I'm preoccupied with glaze fit at the moment. I will post pictures of the tests when they come out early next week.
If you have an electric kiln you should own Richard Zakin's book:
http://ceramicartsdaily.org/bookstore/electric-kiln-ceramics/
Tuesday, February 22, 2011
Thrown, Assembled and Altered Forms

I recently attended a workshop put on by the MHCC studio showcasing Patrick Horsley. He's a NW potter who used to work with one of my long time friends Don Sprague. Pat has spent 40 years perfecting his methods and expressed why he does what he does as he worked. Don taught me the thrown and altered techniques about 13 years ago, but in my early 20's I found these technical forms difficult and tedious. When I took Pat's workshop I rediscovered the techniques Don had instilled in me early in my career. Now in my mid 30's I find these forms challenging and extremely fun to build. So far I've spent the last several days experimenting with large squished oval jars like the one pictured above.
I wholeheartedly endorse Pat's workshops, it did wonders to redirect my body of work back towards something I should have been doing for the last decade. If you have the time for a class, Don Sprague teaches a very similar technique for making these same types of pots.

Saturday, February 5, 2011
Pounders

The pot in the picture above has slightly less weight in the body than the previous mugs I've made, however the handle was a bit more bulky than most for some reason. It feels very heavy in comparison to my other forms, but it has the spiral chatter marks from my tool just like I've been trying to achieve. At this point I just need to work on addressing the weight. It's not terrible, but I'm unsatisfied.
I did go to a gallery day before yesterday and looked at some pieces. I came across some pots from three of the guys who taught me how to make pots. I was amazed at the size and weight of Don Sprague's bowl. Probably 14 inches across by 6 or so inches deep on the inside, and it weighed almost nothing. The walls were uniformly thin, and the foot was not overly heavy. By comparison I picked up a pot next to it made from a slab. The artist intended it to be visually heavy with a rim on the slab bowl about 5/8" thick decorated with cuts or scrapes. The small bowl of about 6 inches across and only 2 1/2" deep weight about the same as Don's bowl.
So because of the emphasis of well made pots from my early instruction from Don Sprague, Wally Schwab and many others, it's of vital importance to me that my work not be heavy, wasteful or poorly made. It's a struggle for me to make some forms as light as I think they should be, but I can't sacrifice quality for design.
Monday, January 24, 2011
Diggin' it!


The clay I was most interested in at the first site was the gray material with the stripes of red iron. Upon closer examination under a good lamp I could see trace amounts of mica. This deposit probably won't be exactly what I'm looking for, however it's exciting to dig a shovel full of something that feels like the clay in your studio.
There are layers of pyroclasts that are not decomposed under the clay. I also found a second set of strata just 10 M down lower in the layers that had another four sections of clay that were similar but different. One was a puce color probably containing manganese, and another was yellow. I didn't have room to take the yellow, so I'll probably go back for a sample later.
Mugs

I used the texture tool on the form and expanded it into a bulbous mug. I sharpened the heavy rim giving it an angle on both the inside and outside. The handle was pulled asymmetrical with the thick side towards the camera. This makes a nice thumb rest in the handles design. Not sure if I'll keep making these or move on to another form.
Subscribe to:
Comments (Atom)